Welcome to the wonderful world of crochet! If you’ve ever admired a cozy blanket, a cute amigurumi toy, or a stylish accessory and wondered how it was made, you’re in the right place. This guide is designed for absolute beginners, walking you through the foundational stitches and skills you need to create your very first project—a simple square swatch. By the end, you’ll have the confidence to start exploring the millions of projects that begin with these basic techniques.
Getting Started: Your First Tools
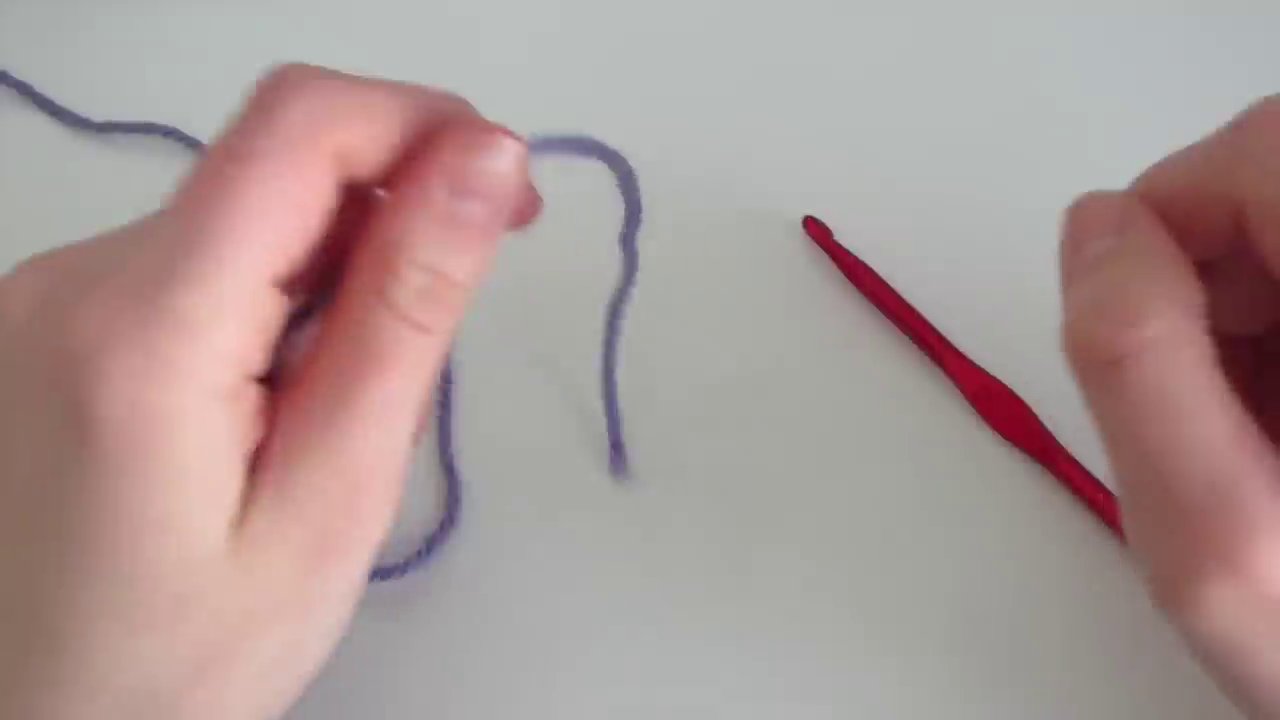
Before we dive into the stitches, let’s gather the essential supplies. The beauty of crochet is its simplicity; you don’t need a huge investment to begin.
- Yarn: You can use any basic yarn you have at home. If you’re purchasing new yarn, opt for a plain, smooth yarn in a light color, which makes it easier to see your stitches. A great recommendation for beginners is 100% acrylic yarn. It’s affordable, durable, and easy to work with.
- Crochet Hook: A standard aluminum crochet hook is perfect for learning. They often come in sets with various sizes, allowing you to tackle different projects and yarn weights in the future. For this tutorial, we’ll be using a 5.5mm crochet hook, a common and versatile size.

With your yarn and hook ready, you’re set to learn the four key skills: making a slip knot, holding your tools, chaining, and the single crochet stitch.
The Foundation: The Slip Knot and How to Hold Your Tools
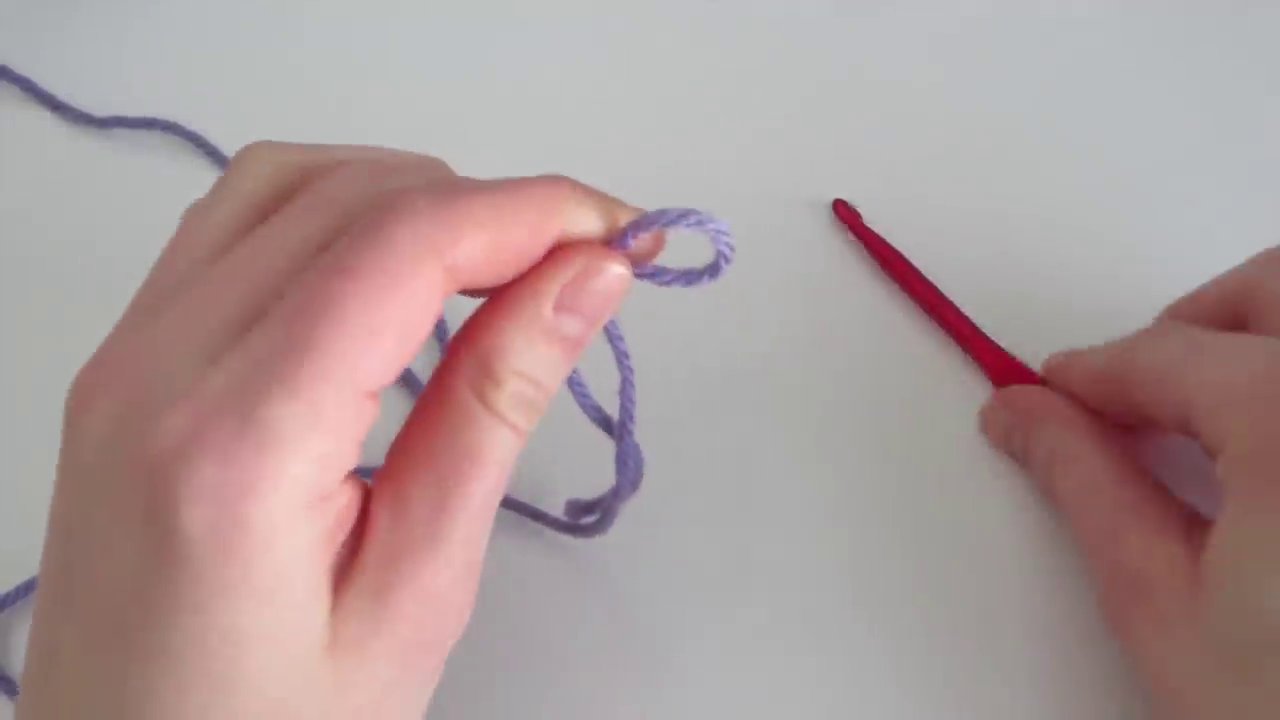
Every crochet project begins with a slip knot. This adjustable loop is what secures your yarn to the hook.
- Hold the yarn tail in your hand with your index finger pointing down.
- Twist the yarn upward to create a loop.
- Put your thumb through that loop, grab the yarn tail with your thumb and index finger, and pull it through, creating a new loop.
- Insert your crochet hook into this loop and pull the yarn tail to tighten it snugly on the hook.
Next, let’s get comfortable holding everything. There’s no single “right” way, but here’s a common method:
- Hold the hook like a pencil or a knife, resting your thumb on the flat indent of the hook for control.
- With your other hand (the yarn hand), you’ll manage the tension. A good method is to weave the yarn through your fingers: over the index finger, under the middle finger, and over the ring finger. Then, use your thumb and middle finger to hold your work. This creates consistent tension, which is key for even stitches.
Learning the Chain Stitch (CH)
The chain stitch is the backbone of most crochet projects. It forms the starting foundation for your work.
- With the slip knot on your hook, hold the hook so it’s facing away from you.
- Place the hook on the left side of the yarn strand (this is called “yarn over” or YO).
- Turn the hook to face towards you, and then slightly toward your left hand.
- Pull the hook downwards, drawing the yarn through the loop already on your hook.
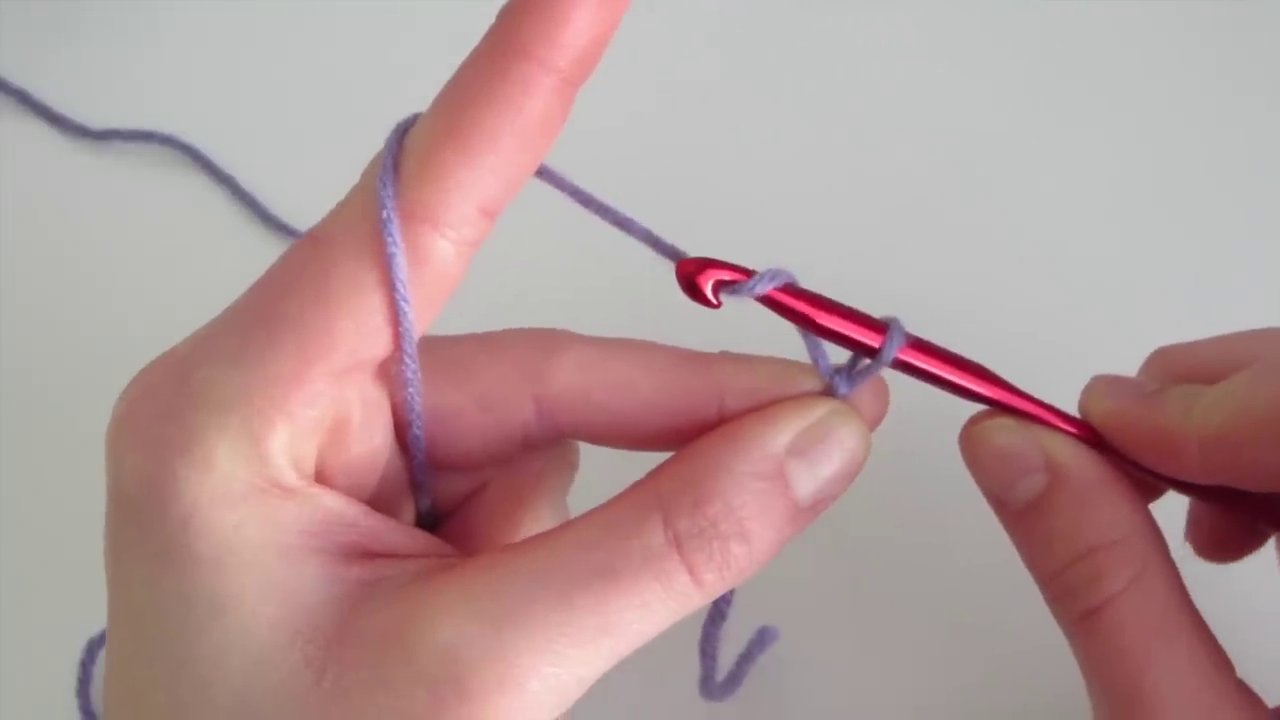
That’s one chain stitch! You’ll see it forms a little “V” shape. Repeat this process: yarn over, pull through. For our practice swatch, we will make a chain of 11. Each “V” has a top loop and a bottom loop, which will be important for the next step.
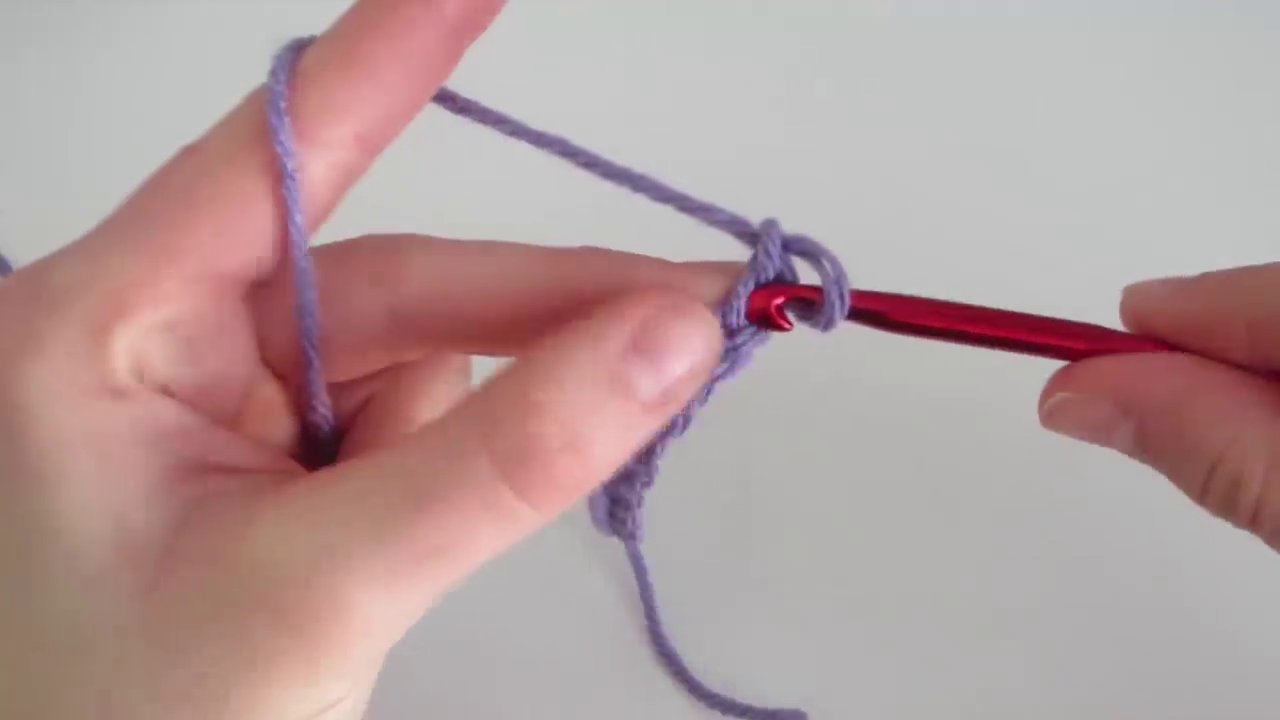
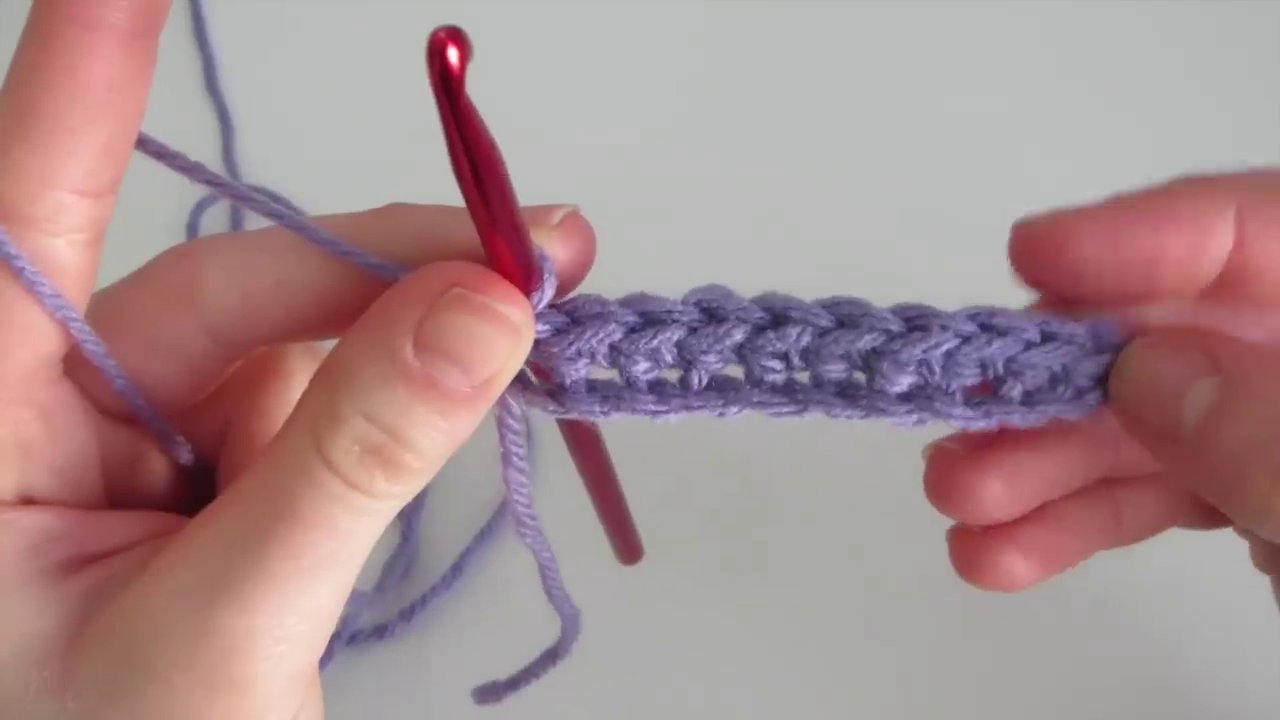
Building Your Fabric: The Single Crochet Stitch (SC)
The single crochet is a fundamental, tight stitch used in countless patterns, from sturdy dishcloths to amigurumi figures like these adorable Cuddly Caterpillars.
- Insert your hook into the second chain from the hook. (We skip the first chain closest to the hook—it acts as a turning stitch for height.)
- Yarn over (hook facing away, then turning towards you).
- Pull that yarn back through the chain stitch. You should now have two loops on your hook.
- Yarn over one more time.
- Pull through both loops on your hook.
Congratulations! You’ve made your first single crochet. Continue working one single crochet into each chain across. When you reach the end, you should have 10 single crochet stitches.
To start your second row and create a square fabric:
1. Chain 1 (this is your turning chain for the new row).
2. Turn your work over.
3. Insert your hook under the top two loops (the “V”) of the first single crochet from the previous row.
4. Work a single crochet stitch as before: yarn over, pull up a loop (2 loops on hook), yarn over, pull through both loops.
Continue across, making one single crochet in each stitch. At the end of every row, chain 1, turn, and repeat. For a perfect little practice swatch, aim for 12 rows of single crochet.
A crucial tip for beginners: Don’t worry if your stitches look uneven or you make a mistake. Simply remove your hook and gently pull the yarn to unravel your work back to the point before the error. Re-insert your hook and try again. Practice is the most important part!
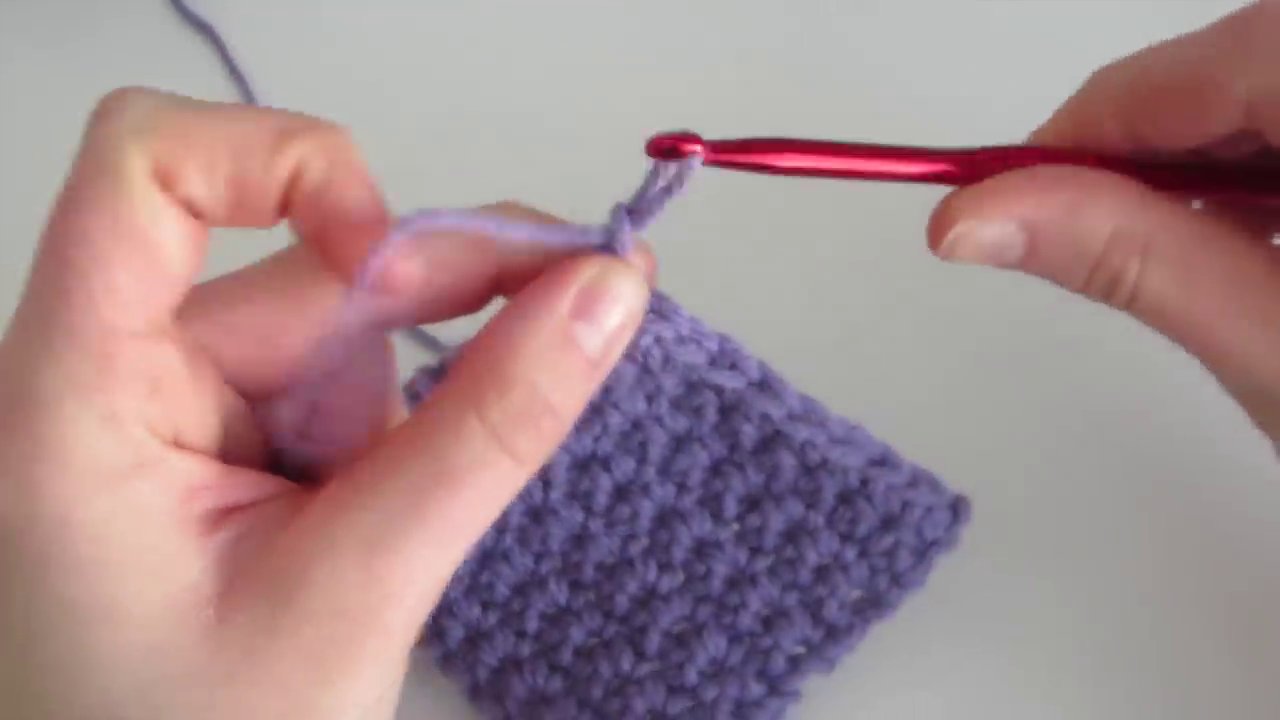
Finishing Your Work: Fastening Off and Weaving In Ends
Once you’ve completed your swatch, it’s time to finish it neatly.
- After your last stitch, chain 1.
- Cut the yarn, leaving a tail of about 6 inches.
- Pull the yarn tail completely through the loop on your hook and tighten. This is called “fastening off” and secures your work so it doesn’t unravel.
To hide the yarn tails and give your work a professional look, you’ll weave in the ends.
– Use a blunt-tip yarn or tapestry needle with a wide eye.
– Thread the yarn tail and weave it back and forth through the stitches on the wrong side of your work.
– After weaving for an inch or two, trim the excess yarn close to the fabric.

Conclusion: Your Crochet Journey Begins
You’ve just learned the essential building blocks of crochet: the slip knot, chain stitch, and single crochet. With just these skills, you can create a vast array of projects. Practice is key—your hands will learn the movements, and your tension will become more consistent with time. Start by making a few more swatches until the motions feel natural.
Remember, every complex pattern, from a Baby Cardigan to a FREE Strawberry Crochet Pattern, is built upon these basic stitches. Keep your first swatch as a reminder of where you started. Grab your hook, take a deep breath, and enjoy the relaxing, creative process of making something with your own hands. Happy crocheting